
Single Sign On (SSO) for Umami Self-Hosted
Umami is becoming one of the best known privacy-friendly alternatives to Google Analytics. However, Single Sign On isn't a part of the self hosted version of the software. There is a workaround, which I'll show you in this article.

To begin, a bit of programming knowledge in your preferred language is really important. In this article I'll be using PHP in a Laravel instance but any other language will suffice as well. Furthermore, in this case I'll be implementing Single Sign On using OpenID Connect and OAuth2, often shortend as OIDC but depending on your use case implementations such as SAML, LDAP or others might suffice as well.
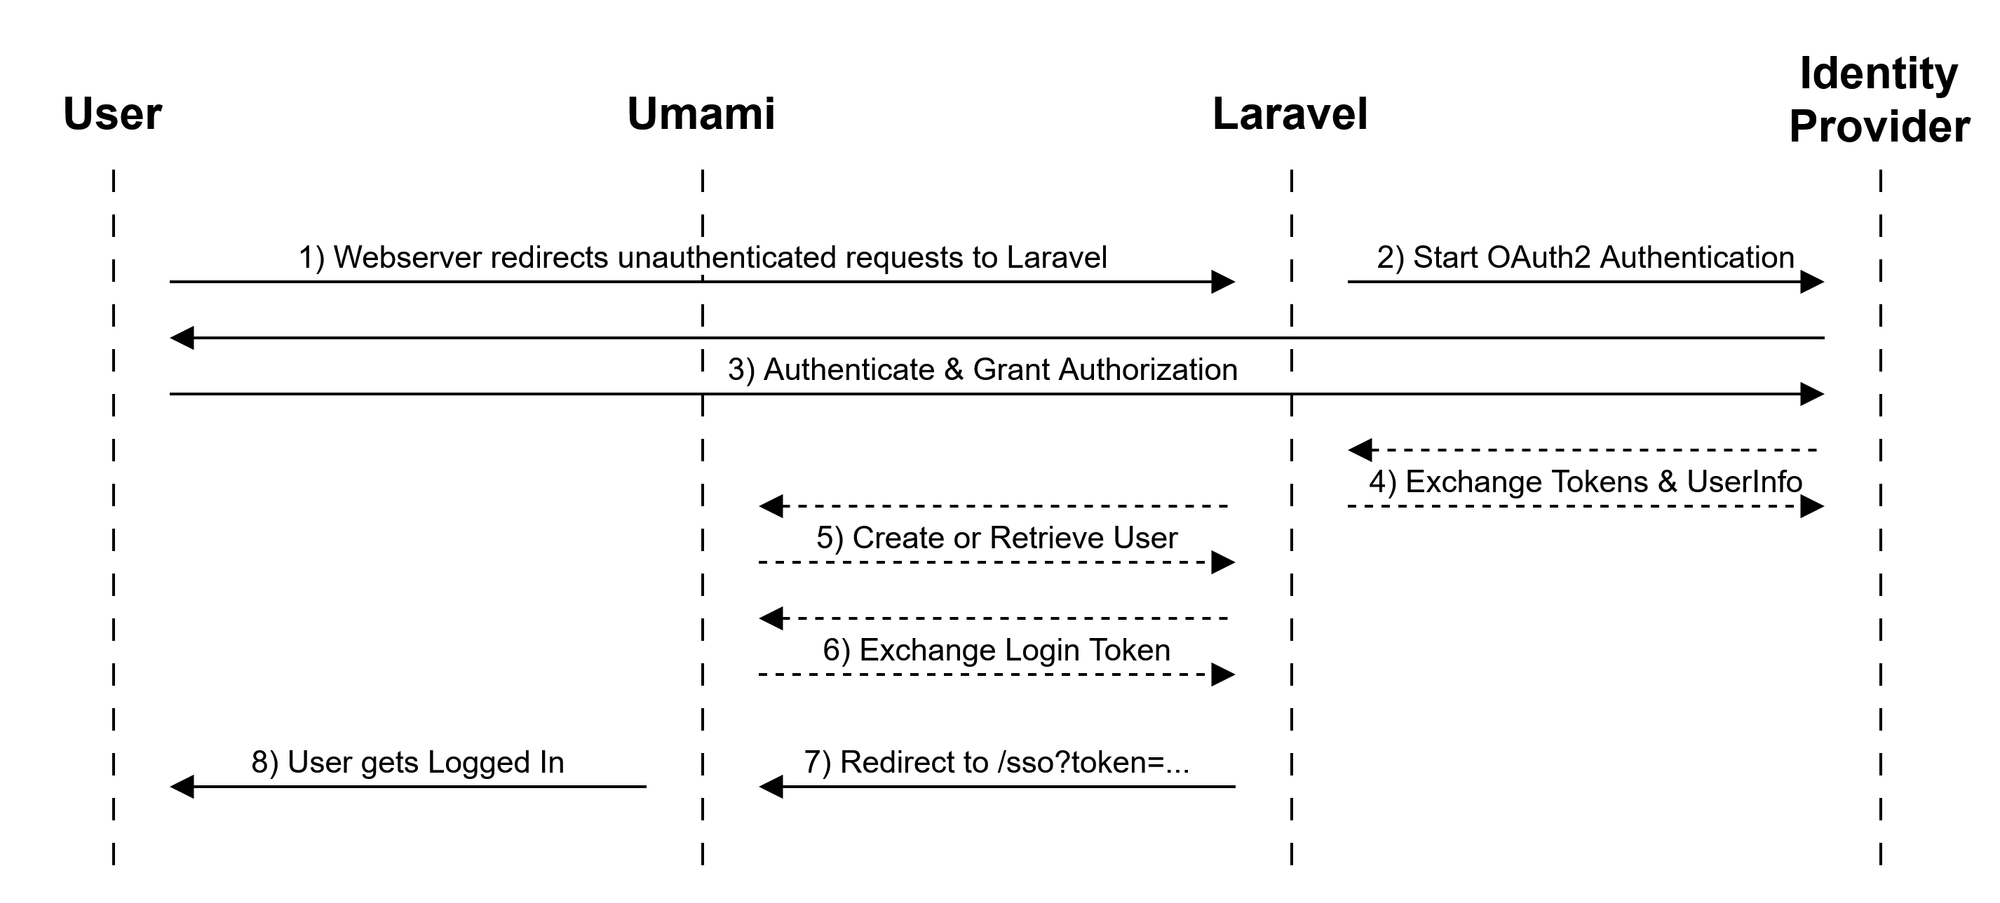
With this out of the way I'll explain how the flow works. In the first step the webserver (e.g. Apache or NGINX) is instructed to redirect the /login endpoint on the Umami instance to a route in my custom Laravel application. The Laravel controller will then create a redirection to my Identity Provider (authentik in my case) which is responsible for the authentication and authorization of the user to the Umami application.
Once the user is granted permission to access the application, it gets redirected to Laravel which will call an Umami API endpoint (/api/users) with the username and a predefined password. If the user didn't exist it will be created, otherwise Umami will return a HTTP 400 code. Using this information Laravel knows to proceed and call another Umami API endpoint. This time Laravel will ask Umami to create an API access key for the user using the same username and password.
If this access key is returned by Umami, Laravel will redirect the user to the /sso endpoint on the Umami instance with the token=previously_generated_access_token and url=/dashboard URL parameters. If all went smoothly, the user should now be logged in.
Code Examples
The NGINX location block which is responsible for redirecting people away from the default Umami login page. If you're using NGINX Proxy Manager, this would go into the Advanced tab of your Proxy Host.
location /login {
    return 301 https://sso.proxeuse.com/login/umami;
}
The callback function inside Laravel which is called after the user is granted permission to access Umami by the Identity Provider. In my case, Laravel Socialite is used.
public function callback()
{
  try {
    // Retrieve the user information from authentik
    $this->authentik = Socialite::with('authentik')
        ->setConfig($this->config)
        ->user();

    // POST /users
    $this->umami = Http::withToken($this->getUmamiToken())
        ->timeout(10)
        ->post('https://umami.example/api/users'), [
            'username' => $this->authentik->getNickName(), // retrieve the username from the Identity Provider
            'password' => $this->generateHashedPassword($this->authentik->getId()),
            'role' => 'user',
        ]);

    if ($this->umami->successful()) {
        // New User created succesfully
        return $this->redirect();
    } elseif (in_array($this->umami->status(), [400, 409], true)) {
        // User probably already exists, try to login
        return $this->redirect();
    } else {
        // Another error occurred
        return $this->errorHandling(new \Exception('Unexpected response from Umami when creating user.'));
    }
  } catch (\Exception $e) {
      return $this->errorHandling($e);
  }
}
The getUmamiToken() function is important because it retrieves an Umami API access token. The user which username and password will be used for this should have the administrator role.
private function getUmamiToken(): string
{
    // We put it in the cache to prevent
    // a new key from being generated each login
    return Cache::remember('umami-api-key', 86400, function () {
        try {
            $response = Http::timeout(10)->post('https://umami.example/api/auth/login'), [
                'username' => env('UMAMI_API_USERNAME'),
                'password' => env('UMAMI_API_PASSWORD'),
            ]);
        } catch (\Exception $e) {
            // Something went wrong
            throw $e;
        }
        if (isset($response) && $response->successful() && isset($response['token'])) {
            // This is the actual token
            return $response['token'];
        } else {
            // Something went wrong
            throw new \Exception('Could not fetch Umami API token.');
        }
    });
}
Another important function is the generateHashedPassword() which standardizes the password so that even after the first login the password can be generated and used to login once again. It consists of the ID (provided by the Identity Provider) and a Salt, which is hashed using sha256.
private function generateHashedPassword(string $id): string
{
    // Use a deterministic salted hash so the same input yields the same output across requests.
    // This value is sent as the plaintext password to Umami; Umami will hash it internally.
    $salt = env('UMAMI_PASSWORD_SALT', 'DEFAULT_UMAMI_SALT');
    return hash('sha256', $id.$salt); // example: a419f5f203d00080bd4e2b350e10ba6968ff6616bfb24c9b31f8471b06f145ce
}
The last piece of the code is the redirection to the Umami /sso page while passing the access token and a pre-defined URL in the parameters. It is really important to URL encode the access token, otherwise errors will be thrown.
private function redirect()
{
    try {
        Log::info('Umami SSO: Attempting to log in user', ['user' => $this->authentik->getNickname(), 'id' => $this->authentik->getId()]);
        // Attempt login with cached API token
        $response = Http::withToken($this->getUmamiToken())
            ->timeout(10)
            ->post('https://umami.example/auth/login', [
                'username' => $this->authentik->getNickname(),
                'password' => $this->generateHashedPassword($this->authentik->getId()),
            ]);

        // Throw if not successful
        if (!$response->successful()) {
            $response->throw();
        }

        $token = $response['token'];

        Log::info('Umami SSO: Redirecting user to Umami', ['user' => $this->authentik->getNickname(), 'status' => $response->status()]);

        return redirect('https://umami.example/sso?url=/dashboard&token='.urlencode($token));
    } catch (\Exception $e) {
        Log::error('Exception fetching Umami API token', ['error' => $e->getMessage()]);
        throw $e;
    }
}
You could make the callback or redirect more complex, for example, retrieving the roles/groups from the Identity Provider and based on that creating/updating the user in Umami according to the role which should be provided. Other API calls to, for example, include a specific user in a Team are naturally also possible.
If you need help with setting this up, please don't hesitate to write me. I'll help gladly, reach out via the discussion below or send us a message 🥰
🌱 Committed to privacy, sustainability & open source. Proxeuse.